Push Notifications: Push Notifications is a kind of notification that will appear wherever you want your visitor to see. This notification will show when the users has activated this message on a site that they are following. Even if the visitor do not open the website in a browser, the notification will still show as a notification when there is an latest post update on the site that works well on desktop and responsive on mobile devices. It works the exact as the bell icon button on every Youtube Channel.
By adding Push Notifications option to your blog or site will certainly encourage more visitors and it will have a positive impact on the future of your blog. Many famous websites that you visit in your daily browsing also use Push Notifications like Social Medias: Facebook, Twitter, and many other similar sites.
For People out there wants to install it on your blog, please follow the few steps mention below.
How to Make Push Notifications on a Blog with OneSignal Plateform
The very 1st step that you should take is to visit the OneSignal site to create Push Notifications on the blog. Then click the Sign Up button .

Complete the registration by email address or you can also login directly through your Google account or Facebook. After registered with OneSignal, click Create account button. As you can see below in image:-

Confirm the link sent to your email id to activate your OneSignal Credentials.

Next step, go to the following address https://app.onesignal.com. Select the New App or Website icon and give a name to the new App that you just added.

Being named, on the Select Platform menu select Web Push style. Then click the Next button to go foreward.

Click on Configure web push page select the 2nd option Website Builder menu and then select Blogger plate form for integration.

Next option or settings, scroll down the page and fill out the Blogger Site Setup form with your blog.

And then scroll down the page and click one icon Add A Prompt button, select whatever features you want to activate for your blog, after finishing, click Save button as shown in the below image.

The Following image shown how its looks on Mobile Phone, MacOs or Windows. You Can skip this step by scrolling.

After all the features are set as desired, scroll down to next step and click the Save button as shown for your reference.

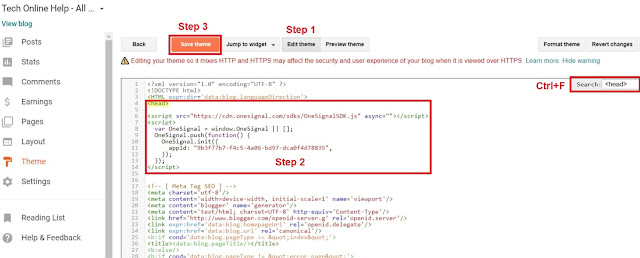
After Saving Next job to add the code in the template before </head> or </head><!--<head/>--> . The following (Figures) guide showing how to do this exactly.

Copy the Below mention Code and go to theme option in your blog select edit HTML and Search for </head> by pressing (Ctrl+F). The step 2 Highlighted show how your code looks.

Once the job done in the template click the Save theme button and click the Finish Setup button on the OneSignal page. Now its Done !!
For an example of the results, please visit to the Demo
Hey Folks, that's all from Tech Online Help for tips on How to Make Push Notifications on a Blog with OneSignal . I'm Hoping that your time provided to this article will be useful.